AI2 and Hexy getting Google app engine Launcher to run a tinywebdb locally on ubuntu 12.04

Ok.. Going on my last weekday of vacation…;( I woke up way too early this morning, freezing.. The furnace had cut out during the night… ( 3 blinky lights on the XR-90 furnace)… It turns out that it was just a ice clogged input pipe.

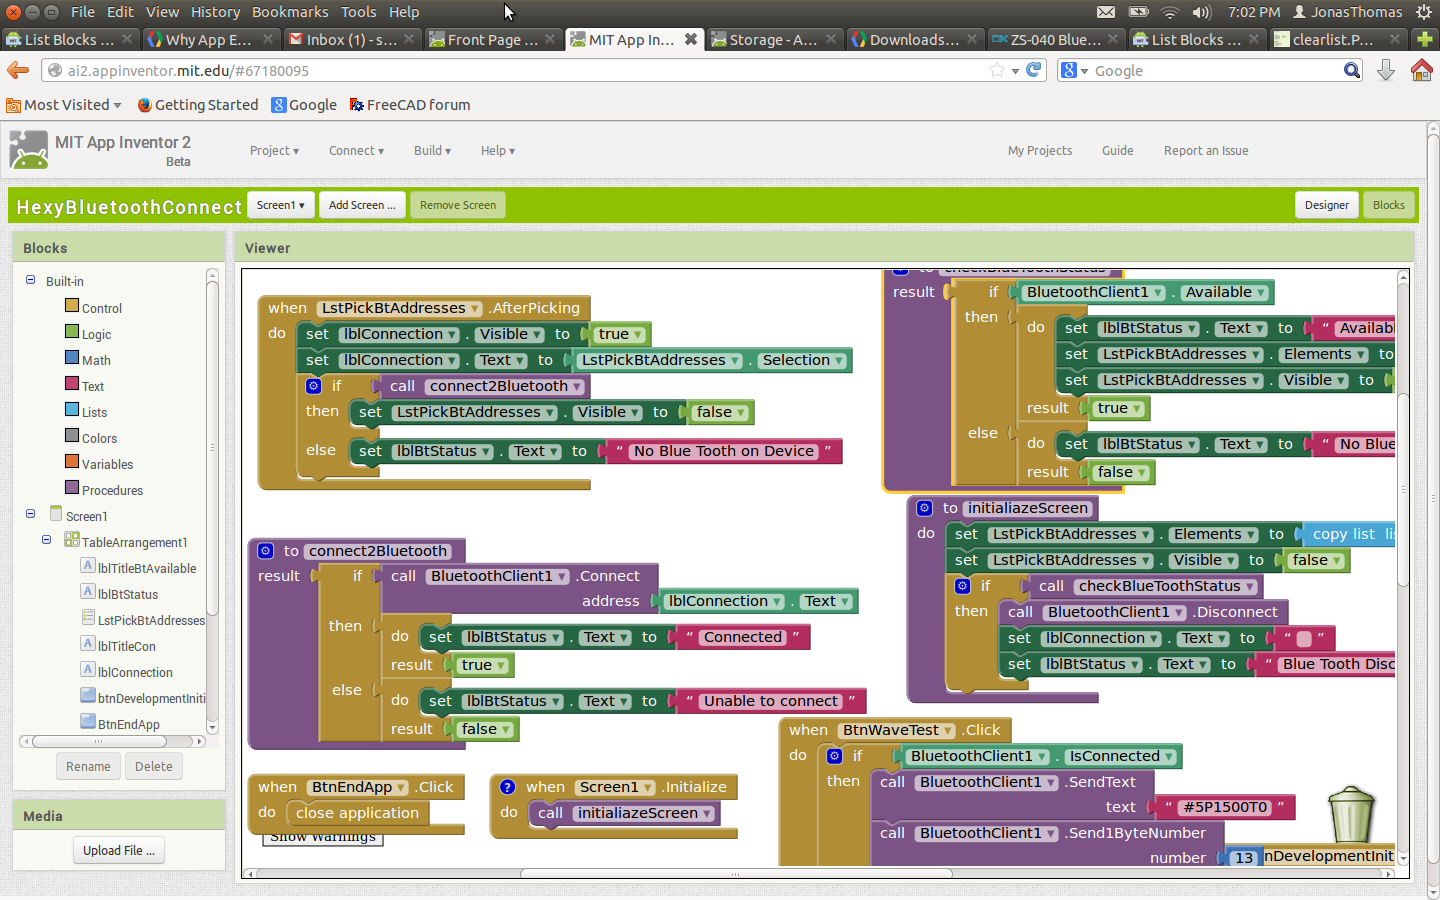
Anyway, I’m not as bright eyed and bushy tailed as I would like but lets see how this works setting up the tinywebdb.. The instructions seem pretty clear. http://beta.appinventor.mit.edu/learn/reference/other/tinywebdb.html

  • Download App Engine for Python

Need at least 2.7 python.

jonasthomas@jonasthomas-Satellite-P305D:~$ python -V
Python 2.7.3

Ok.. need at least pip 1.4. pip is a package manager. http://en.wikipedia.org/wiki/Pip_%28package_manager%29
http://www.pip-installer.org/en/latest/installing.html

Next is the python-sdk

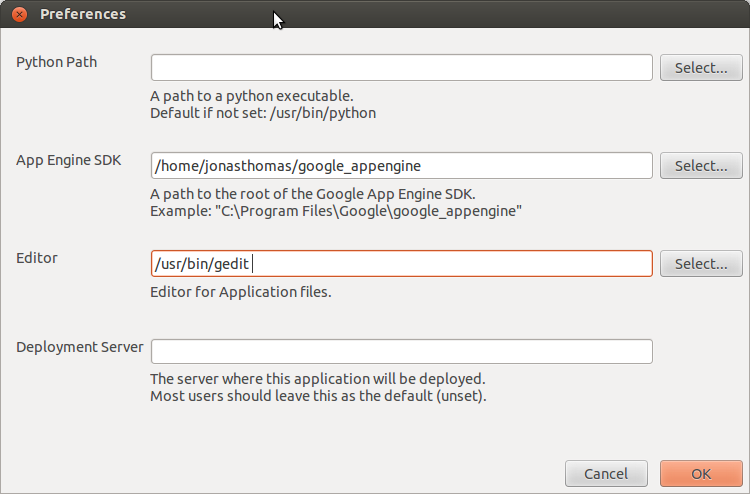
Instructions say I need to add /home/jonasthomas/google_appengine to my path..
Add this to .bashrc
export PATH=$PATH:/home/jonasthomas/google_appengine
then from terminal did source .bashrc

Ok.. Now here’s where I need to bounce back and forth….
I need to download and unzip http://beta.appinventor.mit.edu/learn/reference/other/tinywebdbassets/customtinywebdb.zip

Now this is where things start getting confusing for me…

In the instructions for installing TinyWebDb they say….

After installing it, run the GoogleAppEngineLauncher by clicking its icon

Well after a little bit of head scratching and googling that only applies to Pc and Mac..

But… It appears you can get a launcher according to this http://forums.udacity.com/questions/6001946/linux-users-google-app-engine-launcher-instructions

http://forums.udacity.com/questions/6004229/google-app-engine-launcher

Ok.. I used to have wx installed in my heekscad days but.. I suspect no longer so…

sudo apt-get install python-wxversion python-wxglade
(Yep I needed that.)
svn checkout http://google-appengine-wx-launcher.googlecode.com/svn/trunk/ google-appengine-launcher
cd google-appengine-launcher

Ok.. I got some error messages which are explained here: http://forums.udacity.com/questions/6001946/linux-users-google-app-engine-launcher-instructions
So this is what I added and seems to be working.
preferencesForGoogleAppEngLauncher

Sooo… lets see back to here
Supposedly all I need to do is this:

  • In the GoogleAppEngineLauncher, choose File | Add Existing Application . Browse to set the Path to the customtinywebdb folder you just unzipped. Then click the Run button. This will launch a test web service that runs on your local machine.

  • You can test the service by opening a browser and entering “localhost:8080” as the URL. You’ll see the web page interface to your web service. The end-goal of this service is to communicate with a mobile app created with App Inventor. But the service provides a web page interface to the service to help programmers with debugging. You can invoke the get and store operations by hand, view the existing entries, and also delete individual entries

Well… when I do that I got this: Firefox can’t establish a connection to the server at localhost:8080.
Hmmm.
I found a rough instructions here. http://forums.udacity.com/questions/100063533/firefox-cant-establish-a-connection-to-the-server-at-00008080

But I don’t think that’s it… In this post, they talk about a little green button on the Google app engine Launcher…
No green but an exclamation point…
When I check the log I got this.

2014-01-03 12:10:21 PM Running command: “[‘/usr/bin/python’, ‘/home/jonasthomas/google_appengine/dev_appserver.py’, ‘–admin_console_server=’, ‘–port=8080′, u’/home/jonasthomas/hexy_stuff/customtinywebdb’]”
usage: dev_appserver.py [-h] [–host HOST] [–port PORT]
[–admin_host ADMIN_HOST] [–admin_port ADMIN_PORT]
[–auth_domain AUTH_DOMAIN] [–storage_path PATH]
[–log_level {debug,info,warning,critical,error}]
[–max_module_instances MAX_MODULE_INSTANCES]
[–use_mtime_file_watcher [USE_MTIME_FILE_WATCHER]]
[–threadsafe_override THREADSAFE_OVERRIDE]
[–php_executable_path PATH]
[–php_remote_debugging [PHP_REMOTE_DEBUGGING]]
[–python_startup_script PYTHON_STARTUP_SCRIPT]
[–python_startup_args PYTHON_STARTUP_ARGS]
[–blobstore_path BLOBSTORE_PATH]
[–mysql_host MYSQL_HOST] [–mysql_port MYSQL_PORT]
[–mysql_user MYSQL_USER]
[–mysql_password MYSQL_PASSWORD]
[–mysql_socket MYSQL_SOCKET]
[–datastore_path DATASTORE_PATH]
[–clear_datastore [CLEAR_DATASTORE]]
[–datastore_consistency_policy {consistent,random,time}]
[–require_indexes [REQUIRE_INDEXES]]
[–auto_id_policy {sequential,scattered}]
[–logs_path LOGS_PATH]
[–show_mail_body [SHOW_MAIL_BODY]]
[–enable_sendmail [ENABLE_SENDMAIL]]
[–smtp_host SMTP_HOST] [–smtp_port SMTP_PORT]
[–smtp_user SMTP_USER]
[–smtp_password SMTP_PASSWORD]
[–prospective_search_path PROSPECTIVE_SEARCH_PATH]
[–clear_prospective_search [CLEAR_PROSPECTIVE_SEARCH]]
[–search_indexes_path SEARCH_INDEXES_PATH]
[–clear_search_indexes [CLEAR_SEARCH_INDEXES]]
[–enable_task_running [ENABLE_TASK_RUNNING]]
[–allow_skipped_files [ALLOW_SKIPPED_FILES]]
[–api_port API_PORT]
[–automatic_restart [AUTOMATIC_RESTART]]
[–dev_appserver_log_level {debug,info,warning,critical,error}]
[–skip_sdk_update_check [SKIP_SDK_UPDATE_CHECK]]
[–default_gcs_bucket_name DEFAULT_GCS_BUCKET_NAME]
yaml_files [yaml_files …]
dev_appserver.py: error: unrecognized arguments: –admin_console_server=
2014-01-03 12:10:22 PM (Process exited with code 2)

ohhh… Google is not my friend here, which usually means I did something dumb…. need to retrace some steps here(which is why I like to document this stuff)..
Soo.. At this point I don’t know if the problem is with Google App Engine Launcher, or the tinywebdb.
Soo. I think there was hello world application here:

So… I’m getting the same error message which suggests the issue isn’t necessary with the tinywebdb application…. Soo something is going on with dev_appserver.py

jonasthomas@jonasthomas-Satellite-P305D:~$ locate dev_appserver.py
/home/jonasthomas/google_appengine/dev_appserver.py
/home/jonasthomas/google_appengine/old_dev_appserver.py
/home/jonasthomas/google_appengine/google/appengine/tools/dev_appserver.py
jonasthomas@jonasthomas-Satellite-P305D:~$

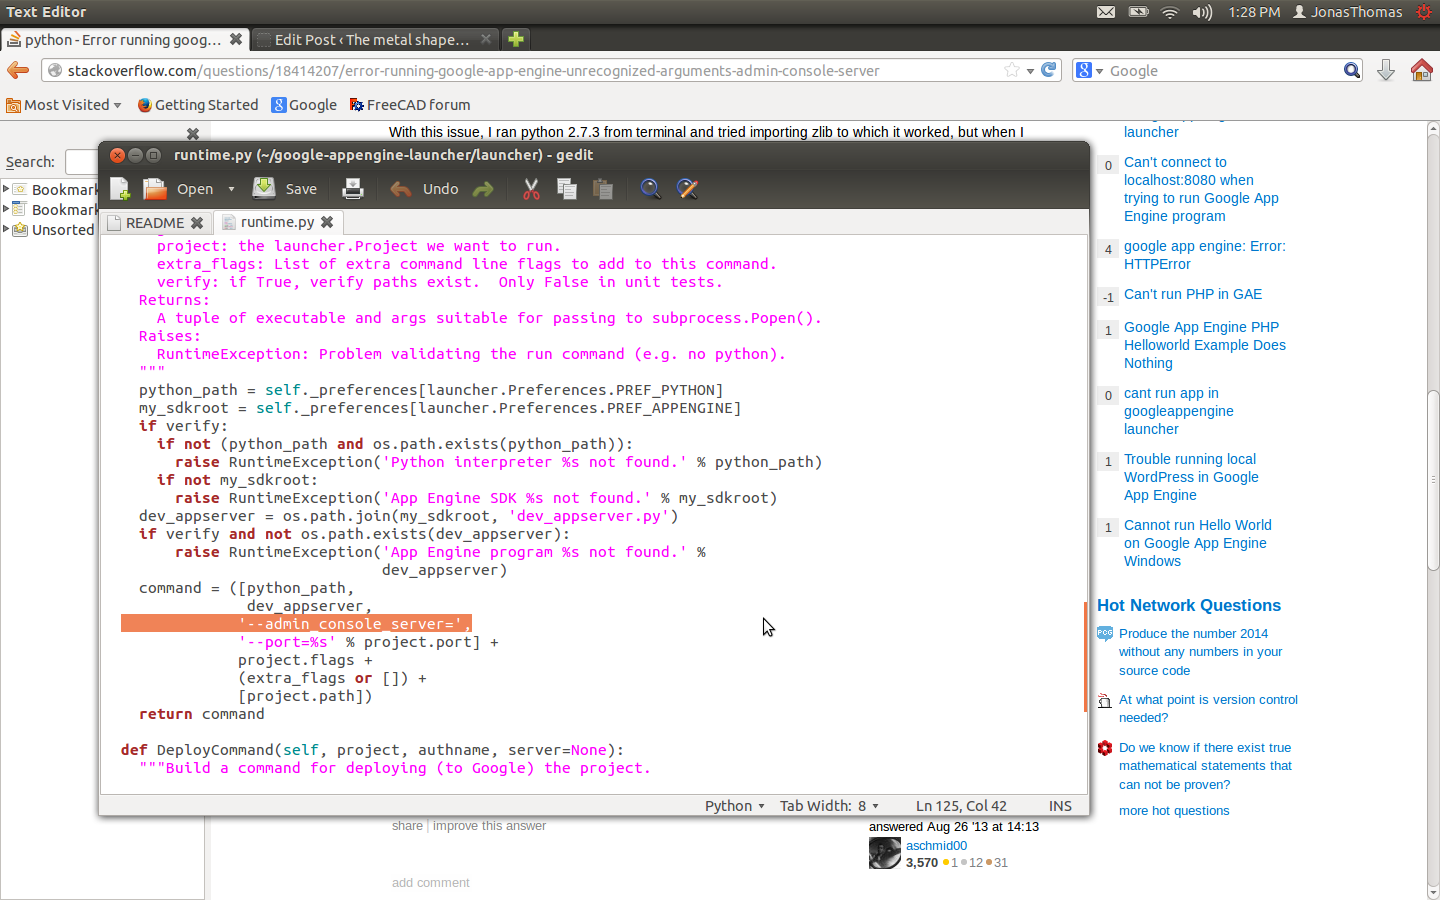
Wrong tree.. I think I found the solution: http://stackoverflow.com/questions/18414207/error-running-google-app-engine-unrecognized-arguments-admin-console-server

Supposedly delete this line will cure the problem….
LinetoDelete

and…..hrrrrggg. green light is on but when I go to http://localhost:8080/ and still no joy….

Hmm. https://support.mozilla.org/en-US/questions/771916
Nope…
Ok… Making progress here…

So basically cd to google_appengine, and ran this and I got it
python dev_appserver.py –port=8080 –host=127.0.0.1 /home/jonasthomas/hexy_stuff/customtinywebdb
and answered “Y” to updates…
Ok.. Lets see what happens if I reboot and try the google-appengine-launcher…
success

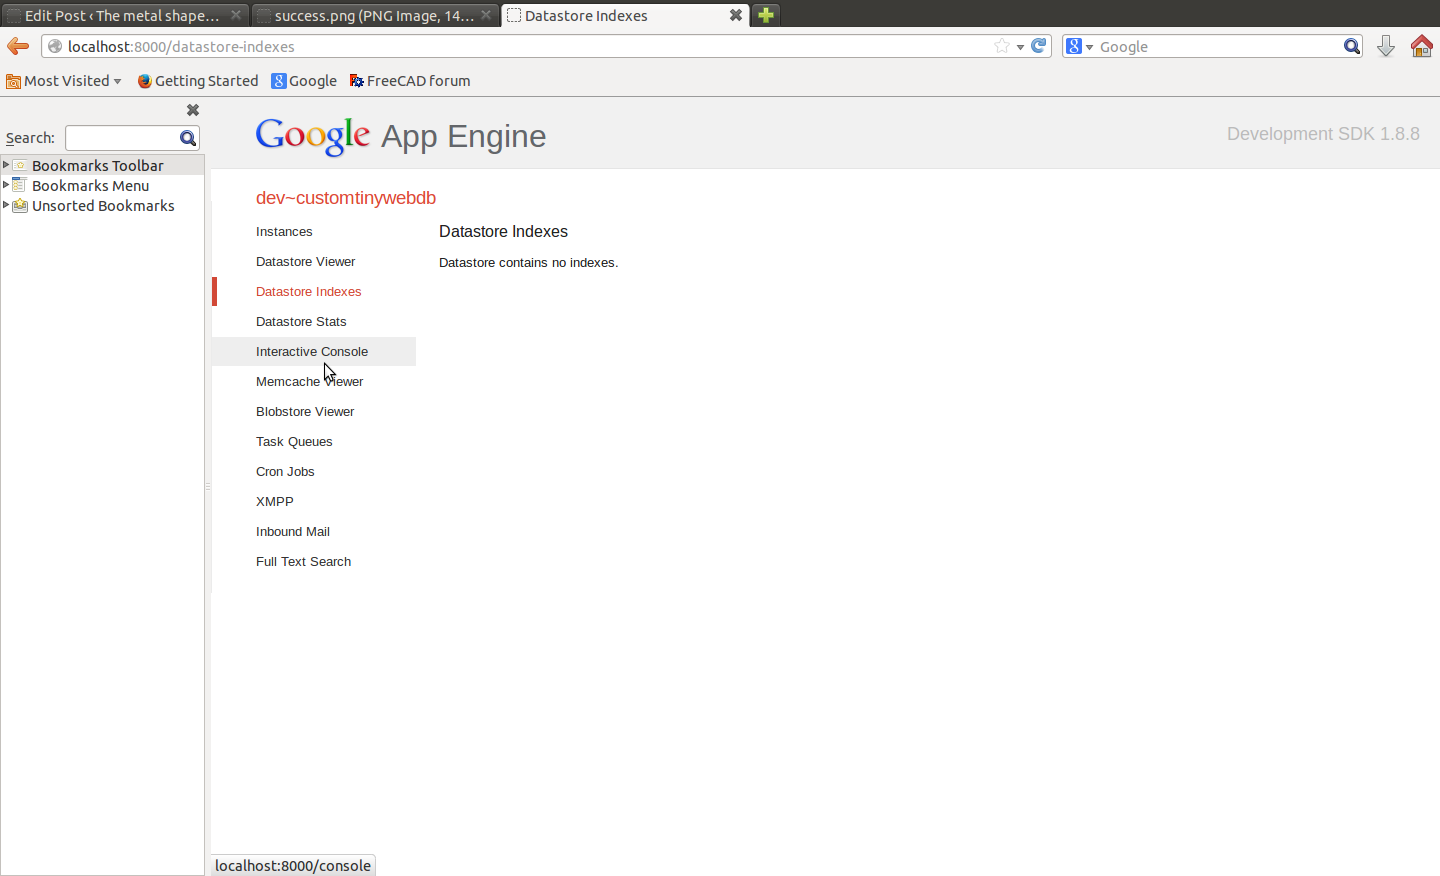
Yeh…Ok… I’m calling this success.
Hopefully someone gets something useful out of my pain…
Geeez.. That felt more painful than it needed to be.

Posted in Uncategorized | Leave a comment

Some more Hexy the Hexapod Nexus7 stuff using AI2

Ok.. I’m feeling emboldened.. Storing tinydbMoves seems to working.. Although I need a delay…
So.. here are the next steps/goals to keep moving the ball on this project:

  • Add a delay step to the tinydbMoves to mimic what was in pomoco
  • Delete the T’s make sure that still works.
  • Create a tinywebdb database.
  • Redirect the hardcoded data there.
  • Have the app download from tinywebdb to tinydbMoves(Eventually offsets compensation will take place in this step but not quite now)
  • Next next goals:
    Get pomono git cloned and provide the data for tinywebdb.
    Get get the dead bug move programmed in. When I’m not using hexy, I’ve been curling up his legs like a dead spider it would be nice to write a routine for that.

    Adding a delay step to AI2:
    Ok… There is a delay function in pomoco.
    Heres a sample:
    time.sleep(0.2)
    Ok.. Pretty sure that is in seconds..
    yep

    so.. need a little googlin to see what AI2 has:
    Hmm.. this is real interesting
    which lead me to thisWaveInPomoco

    Sooo. I was correct that T was creating an error if the move was 3decimal places, so I removed it..
    I added a delay command so here’s what the data stream looks like as well as the delay and moved functions..
    DelayFunction

    LoadMoveData

    UpdatedMove

    Ok.. So that leaves the tinywebdb for this round of goals.
    An here is some info on that…
    http://beta.appinventor.mit.edu/learn/reference/other/tinywebdb.html
    Ok… This is getting a wee bit more involved and I’m going to pursue this after getting a good nights rest..

    Posted in Uncategorized | Leave a comment

    Getting Hexy the Hexapod and my Nexus 7 to talk to each to other using AI2

    In my last post I had 2 basic goals. I wanted to get a blue-tooth connection going between hexy and my nexus (accomplished) and do a head wave…
    I didn’t get the head wave but I did access an individual servo, managed to center the servos, and kill the servos in code. So I’m thinking we accomplished the initial goals.

    When hexy has his legs centered(my daughter has declared hexy as male) all servos are on and he’s sort of stiff. Somehow is back left hip servo gets into resonance and starts vibrating. I feel sort of bad for the guy.. I issue the kill command and that shuts off all the servos, but it also terminates the blue tooth connection.

    Anyway. I found setting up an blue tooth connections to be incredibly easy in AI2..
    HexAi2Screenshot

    I had made a blue tooth connection with hexy (red light goes solid) but took me a little while to figure out how to send a move command which looks like.
    Here is the terminal output for pomoco command for centering.
    pomocoTerminalOutput

    Here is firmware section of code reading the code.
    Servo32ScreenShot

    And I found tally count to be interesting as well:
    tallyCount

    What I find somewhat confusing at the moment it the T’s in the data stream.. It seems the firmware at the moment attempts to ignore it.. Hmmm.. I think I found a bug…currently tallycount reads 4 digits. If the servo time is less than 4 digit length it will add the 0 from the T command..

    Ok..I’m looking at the pomoco move command..

    PomocoMoveCommand

    hmmm. It appears there’s another critter in the move command.

    It looks like the move command with power off is never fired… I believe this line:
    toSend = “#%.4dL\r”%(self.servoNum,int(servoPos))”
    would error out if ever executed.

    So.. It seems like the basic Pomoco commands work.. It just seems that may be critters in the main code.
    I think for now, I’m just going to dump out the basic commands that exist and try exporting them to a tinywedb.

    If I catch the hexapod bug and want to implement some more code, this these links look very interesting to me:
    http://www.lynxmotion.net/viewtopic.php?f=8&t=8697 and
    http://arduin0.blogspot.com/2012/01/inverse-kinematics-ik-implementation.html
    Although I think I’m probably have way too many irons in the fire to get to this…

    Anyway… for now.. I just want to keep things small and achieveable a hopefully fall not too deep in the rabbit hole

    Next step goals:

  • My next move is going to be to make a tinydb object called tinydbMoves
  • Basically I’m just going to hardcode this one with the following values from a pomoco wave.
  • Execute code on startup to populate the object. (tinydb is not persistant in development)
  • create a way button and create a procedure to execute the tinydb tag.
  • Once the wave is working I would say that goal would be achieved..
    Then I think the thing to do after that would be to setup a tinywebdb and poplulate it with the moves from ponoco and download it.. Some where in there( I would need to compensate for offsets.) But that’s getting way ahead of myself… Baby steps for now..
    Just a side note… this looks interesting.
    http://appinventor.mit.edu/appinventor-sources/

    So.. This is the data from a wave..

    #31P1500T0
    #7P1277T0
    #6P1500T0
    #5P1500T0
    #7P1277T0
    #6P944T0
    #5P1277T0
    #6P1388T0
    #5P1500T0
    #7P1277T0
    #6P944T0
    #5P1277T0
    #6P1388T0
    #5P1500T0
    #7P1277T0
    #6P944T0
    #5P1277T0
    #6P1388T0
    #5P1500T0
    #6P1055T0

    I believe servo 31 is the head…
    I’m just going hard code this into a tinydbMoves for now.. (If it works I’ll probably try it without the T0 which I think is redundant for now….)

    I got the routines to load and fire… It appears that I need to put a delay function into the code(I figured as much. My suspicion is that this is built into the pomomoco software..) I suspect that’s what the T was for..

    Anyway… Need to study the ponoco code a bit more and figure out how to do a delay in Ai2..
    Soo.. The screen shot below is missing the delay but it does seem to be working.

    BasicHexAi2TinydbMove

    Ok… It looks the delay is built here…
    WaveInPomoco

    Posted in Uncategorized | Leave a comment

    Some hexy the hexapod notes on getting hexy to run with App Inventor 2

    Sooo… the wife bought a hexy the hexapod for the daughter and me for christmas. (Basically the wife wanted it to be for both of us since she was concerned that our daughter wouldn’t let me play with it.

    Hexy is assembled and had a usb cable sticking out of his hind quarters but I’ve managed to give him a little dignity and I got the Bluetooth running. We started with 4 alkaline batteries and I was getting the dead bug phenomena. So I ran out to home depot and picked NIMI the rating is about 1400 mAH. That’s under the capacity of Arcbotics suggested Actually there was some 2300Mah that I should have gotten.

    One of the things that I’ve been thinking being to do some programming of the hexy from MITS application inventor. At this point, I want to figure out the command syntax that goes into the controller.
    The data stream is decoded here: https://github.com/ArcBotics/Servotor32/blob/master/Code/Servotor32_Default/Servotor32.cpp

    void Servotor32::process(Stream *serial){
      if(serial->available()) { //process input from the USB
        char inChar = (char)serial->read();
        switch(inChar){
          case '#':
            servoCounting = true;
            numCount = 0;
            inServo = -1;
            inPos = -1;
            break;
          case 'D':
            printStatus(serial);
            break;
          case 'P':
            if(servoCounting){
              inServo = tallyCount();
              servoCounting = false;
            }
            posCounting = true;
            numCount = 0;
            break;
          case '\r':
          case '\n':
            if(posCounting){
              inPos = tallyCount();
              posCounting = false;
            }
            if((inServo >=0)&&(inServo <=31)&&(((inPos >= 500)&&(inPos <= 2500))||(inPos == -1))){
              changeServo(inServo,inPos);
              inServo = -1;
              inPos = -1;
            }
            numCount = 0;
            break;
          case 'V':
            serial->println("SERVOTOR32_v2.0");
            break;
          case 'C':
            for(int i=0; i<32; i++){
              changeServo(i, 1500);
            }
            serial->println("All Centered");
            break;
          case 'K':
            for(int i=0; i<32; i++){
              changeServo(i,-1);
            }
            serial->println("All Turned Off");
            break;
          case 'L':
            if(servoCounting){
              inServo = tallyCount();
              servoCounting = false;
            }
            changeServo(inServo, -1);
            break;
          default:
            if((inChar > 47)&&(inChar < 58)){
              if(numCount<4){
                numString[numCount] = inChar-48;
                numCount++;
              }
            }
            break;
        }
      }
    }
    

    Rather than trying to figure out the code. I took a look at the Pomoco python script which generates this stuff to be coded.
    If you change change debug = true in servotorComm.py you get the commands that are being sent to the controller via the usb cable.

    I ran across some hexy code that runs on my Nexus 7 pad here: https://code.google.com/p/andmoco/
    I got the bluetooth working on hexy and it seemed to work.. Although, it seems like the code isn’t quite right. It seems like hexy walking was screwed up.

    Anyway.. I’m tired.. and its time for bed.. I hope what I’ve written makes sense.
    I think my next baby step in my android adventure to to see is the following.

    Establish a bluetooth connection from App inventor to hexy.
    See if I can get hexys head to rotate via App Inventor coding.

    After that I get that accomplished, I’m thinking that I want to see if I can figure out how to link external code to App Inventor 2. I’m thinking either python or java.. which ever works easier.

    Posted in Uncategorized | Leave a comment

    Tearing into some code that debounces a switch with an interupt.

    Once again.. These are more my research notes… There are no guarantees that this is going to make any kind of sense to anyone other than me. I found some code that debounces a switch with a an Arduino interrupt that I  like from here. (Just a side note here… I guess I never figured out how to use this plugin to display code.. how to use is here It appears that for all these years it was my theme that was hosing up the works. ) So here goes..

    modeSelectorWorking

    /*
     * ISR Debounce
     */
    
    // use 2ms debounce time
    #define DEBOUNCE_TICKS (word)microsecondsToClockCycles(2000)
    
    extern volatile unsigned long timer0_overflow_count;
    word keytick;  // record time of keypress
    
    void setup() {
      attachInterrupt(0,KeyPress,FALLING);
    }
    
    void KeyPress() {
      keytick=(word)timer0_overflow_count;
    }
    
    // returns true if key pressed
    boolean KeyCheck() {
      if (keytick!=0) {
        if (((word)timer0_overflow_count-keytick)>DEBOUNCE_TICKS) {
          keytick=0;
          return true;
        }
      }
      return false;
    }
    
    void loop()
    {
      if (KeyCheck()) {
        // do something useful
      }
    }
    

    I tried adapting this code to create a mode select option for my arduino and it seemed like it should work but it doesn’t… @#%! One of the things that’s interesting about these embedded systems is the layers of added complexity over straight coding.. So at this point, I’m not sure if why this isn’t working. It could be on the hardware or software side of things. I don’t fully understand this arudino code, so I wanted to dissect the things that are new for me. So starting out looking at the code there are a few things that I’m a bit fuzzy on and look a bit strange to me. First off there is this..

    #define DEBOUNCE_TICKS (word)microsecondsToClockCycles(2000)
    
    // returns true if key pressed
    boolean KeyCheck() {
      if (keytick!=0) {
        if (((word)timer0_overflow_count-keytick)>DEBOUNCE_TICKS) {
          keytick=0;
          return true;
        }
      }
      return false;
    }
    

    There’s all kinds of things that look strange to me here. Not getting into the logic of what’s going one here it looks like we’re comparing apples and pomegranates here: DEBOUNCE_TICKS is in clock cycles and timer0_overflow_count is an arduino variable that accumulates . I spent a few days trying figure out how all this stuff worked, grepp’ng and googling what all this stuff means, but I found this to be concise and useful.   http://ucexperiment.wordpress.com/2012/03/16/examination-of-the-arduino-millis-function Basically timer0_overflow_count will increment after 64*256 clock cycles.. With a 16 Mhz time timer0_overflow_count itself with overflow in about 50 days (assuming I did my math correctly) and: clockCyclesPerMicrosecond = 16000000/1000000 = 16 MICROSECONDS_PER_TIMER0_OVERFLOW = ((64*256)*1000)/(16000000/1000) = 1024

    #define DEBOUNCE_TICKS (word)microsecondsToClockCycles(2000)
    

    So this should have a physical value of 16*2000 = 32000 clock ticks.. If I’m understanding this correctly this is comparing clock ticks to timer0_overflow_count increment’s The time difference works out to 1024*32000 = 32,768,000 micro second = 32 seconds. I would say this is wrong. I ran across a nice little tutorial and I thought a nice delay time would be about 200 Milliseconds.. So the way this interupt routine works is that every time the signal rises the interupts is triggered and the time is stored (as measured by timer0_overflow_count) The time gap needs to be 200 milli-seconds and it returns true one time and zero’s out the counter. So… in terms of over flow ticks we’re looking at 200000/1024 = 195.3125. Lets just call it 200. Soo.. I think I’ve gotten the code tweaked… ans still not joy. I’m using a seeedstudio electronic Brick Kit I had some code that I wanted to adapt using the interrupt debounced switch and have it display on an LCD display. Basically what I want the switch to do is to switch from one of four modes. It’s become highly annoying that I can’t get this to work, so I’m starting to strip things down to basics.. I had some suspicions that I had a bad switch. Ok.. (I did see a bent pin on the shield (Rx) that wasn’t seated), (I don’t think that was messing things up.) So I ran this program and the light came on when the switch was pressed.

    int Button = 9;
    int LED = 8;
    //define the 9th digital pin for button brick
    //define the 8th digital pin for LED brick
    void setup()
    {
      pinMode(LED,OUTPUT); //set the LED pin for digital output
      pinMode(Button,INPUT); //set the Button pin for digital input
    }
    void loop()
    {
     if (digitalRead(Button))
       digitalWrite(LED,HIGH);
     else
       digitalWrite(LED,LOW);
    }
    

    Soo I’m concluding the switch is functional.
    Now the next think I need to do is to get the switch over to Pin2 which reacts to a hardware interrupt.

    For my purposes I need to set 4 modes of operation.. At this point I don’t have the 4 modes implemented but they are defined.. The mode selection is working.

    #include <LiquidCrystal.h>
    
    const int potentiometerPin = 4;  // analog pin used to connect the potentiometer
    const int interuptPin = 2; 
    
    int currentPotValue;
    int tempValueHigh;
    int tempValueLow;
    int tempValueCurrent;
    
    
    #define MODE_OFF 0
    #define MODE_SET_LOW 1
    #define MODE_SET_HIGH 2
    #define MODE_ON 3
    
    LiquidCrystal lcd(10,11,12,13,14,15,16);
    
    
    #define OVERFLOW_INCREMENENTS 300
    extern volatile unsigned long timer0_overflow_count;
    
    #define DEBOUNCE_TICKS (word)microsecondsToClockCycles(2000)
     
    extern volatile unsigned long timer0_overflow_count;
    word btnDownTime;  
      
    int modeValueCurrent = MODE_OFF;
    int modeValuePrevious = MODE_ON;


    void setup() {
      attachInterrupt(0,btnDown,FALLING);
      lcd.begin(16, 2);
      lcd.clear();
      lcd.setCursor(0,0);
    
    }
     
    void btnDown()
    {
        btnDownTime=(word)timer0_overflow_count;
    }


    boolean btnDownCheck() {
      if (btnDownTime!=0) {
        if (((word)timer0_overflow_count-btnDownTime)>OVERFLOW_INCREMENENTS) {
          btnDownTime=0;
          return true;
        }
      }
      return false;
    }
    
     
    void loop()
    {
      if (btnDownCheck()) {
    
          modeValueCurrent++;
          if (modeValueCurrent>MODE_ON)   
          {
            modeValueCurrent=MODE_OFF;   
          }
    
      if (modeValueCurrent !=modeValuePrevious)
       {
          //lcd.clear();
          lcd.setCursor(0,0);
          switch (modeValueCurrent)
          {
            case MODE_ON:
              lcd.print("MODE:ON  ");
              break;
            case MODE_SET_LOW:
            lcd.print("MODE:LOW ");
              break;
            case MODE_SET_HIGH:
            lcd.print("MODE:HIGH");
            break;
            case MODE_OFF:
               lcd.print("MODE:OFF");
               
            break;
            default:
            lcd.print("ERR");
        
            break;
            
          }
       }
    
     modeValuePrevious= modeValueCurrent;
     
      }
    }
    
    Posted in Uncategorized | Comments Off on Tearing into some code that debounces a switch with an interupt.

    Moisture and temperature sensing for Bess Beetles and the Beewax project.