
I’ve already have add a smattering of sizers already. I guess this part of the zetcode wxWidget tutorial goes through that..
Lets see what surprises are in store for Absolute Positioning.
The first example shows absolute positioning. The author of the tutorial makes it point, that almost no one in a production environment would use absolute positioning. Everyone would use sizers. In my vb6 code I like to use the Resize event to hard code the resizing of components to a window… I guess wxwidgets takes care of that automatically..
Any way… lets see the Absolute Position example…
The code basically shows how absolute positioning such on a re-size event.
Only other thing is that I believe this is the first use of the wxTextCtrl. The only thing is we’re doing nothing interesting with it.
I suppose what would be cool would be to figure out how to turn on the word wrap…. How hard can that be??
Ok… time to surf the documentation
Lets see msw and gtk can be changed dynamically…That’s interesting…
This is easy.. Just need to add as follows.
textctrl = new wxTextCtrl(panel, -1, wxT(“”), wxPoint(-1, -1),
wxSize(250, 150),wxTE_MULTILINE );
Ok… Enough of this tutorial. Now I’m on to “Using Sizers”.
This is an interesting example… Normally you stick stuff into a panel and put the panel into the wxframe. According to the tutorial wxframe as a sizer build in that can accommodate one widget…,
Time to download the code and see what happens if I put in two…
On widget you get the sizer works and with two it doesn’t there you go…
Next to the WxBoxSizer
The sample looks like this:
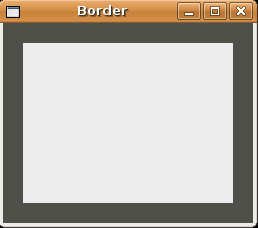
It looks sort of cool.. Here is border.cpp with appropriate links to the documentation:
#include “border.h”
Border::Border(const wxString& title)
: wxFrame(NULL, wxID_ANY, title, wxDefaultPosition, wxSize(250, 200))
{wxColour col1, col2;
col1.Set(wxT(“#4f5049”));
col2.Set(wxT(“#ededed”));wxPanel *panel = new wxPanel(this, -1);
panel->SetBackgroundColour(col1);
wxBoxSizer *vbox = new wxBoxSizer(wxVERTICAL);wxPanel *midPan = new wxPanel(panel, wxID_ANY);
midPan->SetBackgroundColour(col2);vbox->Add(midPan, 1, wxEXPAND | wxALL, 20);
panel->SetSizer(vbox);Centre();
}
It’s getting a little late an this stuff isn’t making that much sense to me at the moment…
In this example we basicallly have , a panel within a panel within a frame.
On the vbox->Add…
wxSizerItem* Add(wxWindow* window, int proportion = 0,int flag = 0, int border = 0, wxObject* userData = NULL)
I’m a little unclear on the proportion… Documentation is a follows:
proportion
Although the meaning of this parameter is undefined in wxSizer, it is used in wxBoxSizer to indicate if a child of a sizer can change its size in the main orientation of the wxBoxSizer – where 0 stands for not changeable and a value of more than zero is interpreted relative to the value of other children of the same wxBoxSizer. For example, you might have a horizontal wxBoxSizer with three children, two of which are supposed to change their size with the sizer. Then the two stretchable windows would get a value of 1 each to make them grow and shrink equally with the sizer’s horizontal dimension.
The author than gets into the alignment of widgets. This section is untitled but explores some of the flag options
| wxTOP wxBOTTOM wxLEFT wxRIGHT wxALL |
These flags are used to specify which side(s) of the sizer item the border width will apply to. |
| wxEXPAND | The item will be expanded to fill the space assigned to the item. |
| wxSHAPED | The item will be expanded as much as possible while also maintaining its aspect ratio |
| wxFIXED_MINSIZE | Normally wxSizers will use GetAdjustedBestSize to determine what the minimal size of window items should be, and will use that size to calculate the layout. This allows layouts to adjust when an item changes and its best size becomes different. If you would rather have a window item stay the size it started with then use wxFIXED_MINSIZE. |
| wxRESERVE_SPACE_EVEN_IF_HIDDEN | Normally wxSizers don’t allocate space for hidden windows or other items. This flag overrides this behavior so that sufficient space is allocated for the window even if it isn’t visible. This makes it possible to dynamically show and hide controls without resizing parent dialog, for example. This function is new since wxWidgets version 2.8.8 |
| wxALIGN_CENTER wxALIGN_CENTRE wxALIGN_LEFT wxALIGN_RIGHT wxALIGN_TOP wxALIGN_BOTTOM wxALIGN_CENTER_VERTICAL wxALIGN_CENTRE_VERTICAL wxALIGN_CENTER_HORIZONTAL wxALIGN_CENTRE_HORIZONTAL |
The wxALIGN flags allow you to specify the alignment of the item within the space allotted to it by the sizer, adjusted for the border if any. |
Giving that a go, I guess we’ll see if there is anything worth commenting about.
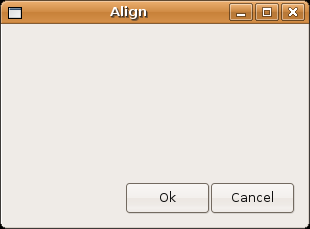
Ok.. I have to confess this is sort of cool.. In vb6 I would basically avoid laying out a form like this. Typically I would layout a command err… button whatever on the left and or top of a form err…. frame. Unless I never discovered some functionality, this would take a bit of coding to do.. Anyway back to business at hand.
#include “align.h”
Align::Align(const wxString& title)
: wxFrame(NULL, -1, title, wxPoint(-1, -1), wxSize(300, 200))
{wxPanel *panel = new wxPanel(this, -1);
wxBoxSizer *vbox = new wxBoxSizer(wxVERTICAL);
wxBoxSizer *hbox1 = new wxBoxSizer(wxHORIZONTAL);
wxBoxSizer *hbox2 = new wxBoxSizer(wxHORIZONTAL);wxButton *ok = new wxButton(panel, -1, wxT(“Ok”));
wxButton *cancel = new wxButton(panel, -1, wxT(“Cancel”));hbox1->Add(new wxPanel(panel, -1));
vbox->Add(hbox1, 1, wxEXPAND);hbox2->Add(ok);
hbox2->Add(cancel);vbox->Add(hbox2, 0, wxALIGN_RIGHT | wxRIGHT | wxBOTTOM, 10);
panel->SetSizer(vbox);Centre();
}
One thing I’m noticing is the “-1″‘s showing up everywhere for the identifier
I pulled this out wxpanel documentation. I’m assuming it applies all over.
id
An identifier for the panel. A value of -1 is taken to mean a default.
Ok… At first glance this has got me confused. The author of the tutorial is making some important points here. I should focus on what he’s saying.
This is not going to be a concise as what’s in the tutorial but here is my understanding of whats going on.
We start out with a frame and a panel (panel) inside of it. I’m thinking of that as a magnetic board. On that magnetic board were sticking two buttons “Ok” and “Cancel”. For fun at this point I’m going to rem err…. comment out all the box sizers and see what happens…
#include “align.h”
Align::Align(const wxString& title)
: wxFrame(NULL, -1, title, wxPoint(-1, -1), wxSize(300, 200))
{wxPanel *panel = new wxPanel(this, -1);
// wxBoxSizer *vbox = new wxBoxSizer(wxVERTICAL);
// wxBoxSizer *hbox1 = new wxBoxSizer(wxHORIZONTAL);
// wxBoxSizer *hbox2 = new wxBoxSizer(wxHORIZONTAL);wxButton *ok = new wxButton(panel, -1, wxT(“Ok”));
wxButton *cancel = new wxButton(panel, -1, wxT(“Cancel”));// hbox1->Add(new wxPanel(panel, -1));
// vbox->Add(hbox1, 1, wxEXPAND);
//
//
// hbox2->Add(ok);
// hbox2->Add(cancel);
//
// vbox->Add(hbox2, 0, wxALIGN_RIGHT | wxRIGHT | wxBOTTOM, 10);
// panel->SetSizer(vbox);Centre();
}
This is actually sort of cool… It looks if one button is on top of the other as only Cancel shows… which is sort of cool… I’m going to confirm this by adding:
cancel->Show(false);
Yep that’s exactly whats going on. Ok now I took that out… I’m going to uncomment out hbox2 with a minor modification to setsizer to see what happens.
#include “align.h”
Align::Align(const wxString& title)
: wxFrame(NULL, -1, title, wxPoint(-1, -1), wxSize(300, 200))
{wxPanel *panel = new wxPanel(this, -1);
// wxBoxSizer *vbox = new wxBoxSizer(wxVERTICAL);
// wxBoxSizer *hbox1 = new wxBoxSizer(wxHORIZONTAL);
wxBoxSizer *hbox2 = new wxBoxSizer(wxHORIZONTAL);wxButton *ok = new wxButton(panel, -1, wxT(“Ok”));
wxButton *cancel = new wxButton(panel, -1, wxT(“Cancel”));// hbox1->Add(new wxPanel(panel, -1));
// vbox->Add(hbox1, 1, wxEXPAND);
//
//
hbox2->Add(ok);
hbox2->Add(cancel);
//
// vbox->Add(hbox2, 0, wxALIGN_RIGHT | wxRIGHT | wxBOTTOM, 10);
// panel->SetSizer(vbox);
panel->SetSizer(hbox2);
Centre();
}
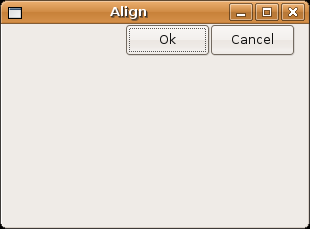
Ok… now we basically have two buttons next to each other in the upper left hand corner.
Next experiment is to turn on the vertical boxsizer and return the setsizer to original.
#include “align.h”
Align::Align(const wxString& title)
: wxFrame(NULL, -1, title, wxPoint(-1, -1), wxSize(300, 200))
{wxPanel *panel = new wxPanel(this, -1);
wxBoxSizer *vbox = new wxBoxSizer(wxVERTICAL);
// wxBoxSizer *hbox1 = new wxBoxSizer(wxHORIZONTAL);
wxBoxSizer *hbox2 = new wxBoxSizer(wxHORIZONTAL);wxButton *ok = new wxButton(panel, -1, wxT(“Ok”));
wxButton *cancel = new wxButton(panel, -1, wxT(“Cancel”));// hbox1->Add(new wxPanel(panel, -1));
// vbox->Add(hbox1, 1, wxEXPAND);
//
//
hbox2->Add(ok);
hbox2->Add(cancel);
//
vbox->Add(hbox2, 0, wxALIGN_RIGHT | wxRIGHT | wxBOTTOM, 10);
panel->SetSizer(vbox);Centre();
}
Interesting now I’m going to turn everything back on an make this modification.
And mess around with this to see what changes
vbox->Add(hbox2, 0, wxALIGN_RIGHT | wxRIGHT | wxBOTTOM, 10);
Change:
vbox->Add(hbox2, 0, wxALIGN_RIGHT | wxRIGHT | wxBOTTOM, 20);
The border gets bigger on the bottom and right
Change:
vbox->Add(hbox2, 0, wxBOTTOM, 10);
buttons go to the bottom and align from the left.
Change:
vbox->Add(hbox2, 0, wxALIGN_RIGHT, 10);
Now this is curious. Apparently the border gets disabled when you do this..
Change:
vbox->Add(hbox2, 0, wxRIGHT, 10);
Now this is even more curious. Buttons show up on the bottom left with no border go figure.
I guess I should take a quick look at the documentation… Oh cool… This makes perfect sense…
I told it to apply the border with to the right hand side and since I had no alignment pushed it to the left with no border.
So If I wanted to put it in the center with a little border from the bottom I would do this.
vbox->Add(hbox2, 0, wxALIGN_CENTER_HORIZONTAL|wxBOTTOM, 20);
Ok… Enough of this fun… I’m starting to get a lag for updating this page… Time to start another one.